BlogBook Documentation
BlogBook is a Mac app that exports your WordPress, Ghost, or Micro.blog blog to Markdown or EPUB. This guide walks you through the flow and features in the order you’ll see them in the app.
1. Connect with credentials
On the first screen you enter your blog URL. BlogBook autodetects the blog type (WordPress, Ghost, or Micro.blog) when you tap Detect, or you can manually select the platform from the dropdown. The credential fields then change based on the selected platform.
-
Blog URL — Your site URL (e.g.
https://example.comorhttps://username.micro.blog). You can type it or pick a previously saved blog from the dropdown. - Platform — Detected automatically, or choose WordPress, Ghost, or Micro.blog yourself if detection doesn’t work.
After you tap Connect, BlogBook verifies the credentials and fetches your site name and description. If something fails, an error message explains what went wrong.

WordPress
BlogBook uses the WordPress REST API and requires an application password instead of your standard login. See Application Passwords for the full WordPress walkthrough.
Ghost
Ghost exports require a Content API key from a Custom Integration. Follow Ghost Content API Keys for screenshots and step-by-step instructions.
Micro.blog
Micro.blog connects with an app token created under Account → App tokens. The complete flow is documented in Micro.blog App Tokens.
2. Filter what to export
Once connected, you see the filtering screen. The header shows your blog name and a Change Blog link to go back to credentials. Use the four sections to limit which posts are included in the export.
Note: Not all filter options are available for every platform. Micro.blog does not support author filtering (blogs are typically single-author). Ghost uses tags instead of categories, so the Categories section is not shown for Ghost blogs.

Categories
Categories load from your blog. Each category shows its post count. Use the checkboxes to include or exclude categories; only posts in at least one selected category are exported. Use Select All / Deselect All to toggle everything.

Authors
If your site exposes authors via the API, you can filter by author. Only posts by at least one selected author are included. On some setups, author data requires admin access; if so, you’ll see a message and the authors list may be empty.
Tags
Tags are shown in a token-style field. Type to search and add tags; you can also open the dropdown to browse all tags. Selected tags are combined with OR logic: a post is included if it has any of the selected tags. Remove a tag by clicking the × on its chip.

Date range
Choose a From and To date. Only posts published within this range are exported. The range is limited to the actual post dates on your blog. If the end date is before the start date, a warning is shown. Use Reset to Full Range to set the range back to the full span of your content.
The footer shows a determinate circular indicator while post counts are updating, then summarizes your filters (e.g. “Filtering by: 2 categories, 1 author”) or “All posts will be included.” Tap Continue to go to export options.
3. Export options
On the options screen you configure metadata, dates, content, table of contents, and output format. A left sidebar lets you jump to each section; the center panel shows the settings; and a right-hand Preview panel shows a live sample of the output. The sections appear in this order:
Book Metadata
Set a Book title and Book author(s) (multiple authors separated by commas). Choose the metadata format: MultiMarkdown, YAML Front Matter, or Pandoc—written at the top of the file so tools like Marked or Pandoc can use it. For EPUB exports, title and author are embedded in the book metadata.


Post dates
Turn Include post date in output on or off. When on, you can pick a date format (e.g. 2024-01-15, January 15, 2024, etc.). The date appears under each post title in the Markdown or EPUB.
Content
Include source URL for each post — When on, each post gets a link back to the original URL. Choose Source: <URL> (plain) or Source (Markdown link).
Include tags — If on, each post’s tags are written in the output. Choose Above post or Below post, and optionally enable Linked to make tags link to your site’s tag archive URLs (Markdown only).
Add page break before each post — Inserts `
` (Marked syntax) before each post for clean page breaks in PDF and other Markdown-based exports.
Download images — If on, images (and video sources) in post content are downloaded and saved. For Markdown, they go into an assets folder and references are updated. For EPUB, images are embedded directly so the book reads correctly offline. Embedded YouTube iframes are converted into linked thumbnail images. When EPUB is selected, image download is always on.
Preserve image attributes — When off, images are converted to basic Markdown: . When on, BlogBook preserves richer markup: alignment classes become inline styles, unknown attributes are kept, width and height are preserved, and figcaptions become image titles. Use Attribute output to choose MultiMarkdown 6 / Apex (extended Markdown syntax) or HTML (raw <img> tags). The extended Markdown syntax may not render correctly in processors other than MultiMarkdown 6 or Apex.

Table of contents
Include Table of Contents — When on, BlogBook adds a table of contents. Choose the TOC syntax:
- Marked syntax () — Inserts a marker after the main title. Set Maximum header depth (H2–H6) to control which headings appear. Marked and similar tools generate the TOC from this marker.
- MultiMarkdown syntax ({{TOC}}) — Inserts the MultiMarkdown TOC placeholder.
- Kramdown syntax ({:.toc}) — Inserts a Kramdown TOC block.
- Hardcoded list of links — Writes explicit Markdown links to each post header. Use Output processor (MultiMarkdown or GitHub Flavored Markdown) to control how header IDs are generated so the links resolve correctly.
For EPUB, the TOC is built into the nav file automatically.
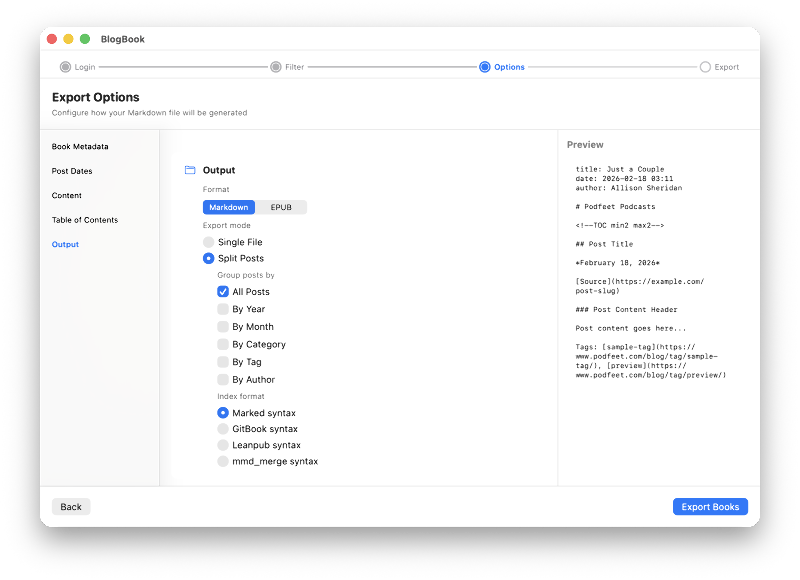
Output
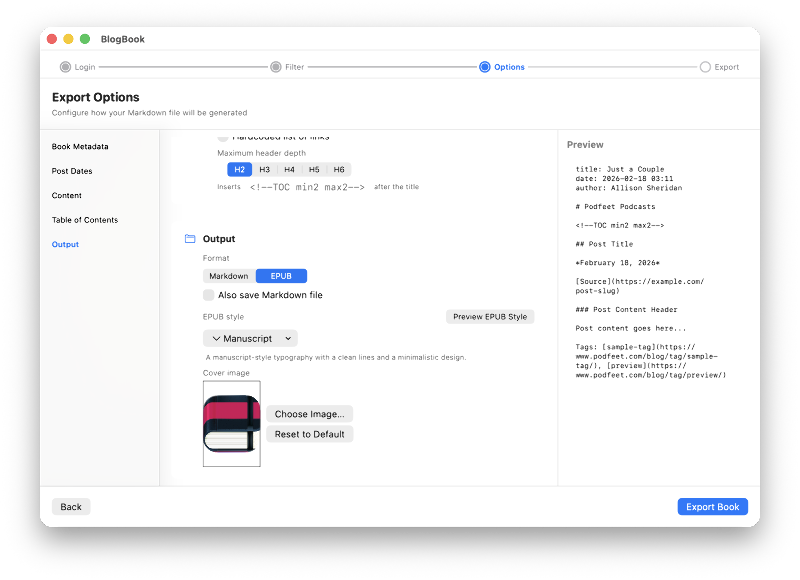
The Output section is last. Choose Format: Markdown or EPUB.
Markdown — Produces .md files (and optionally an assets folder) suitable for Marked, Pandoc, or any Markdown tool. Export mode lets you choose Single File (one combined output) or Split Posts (multiple files). When Split Posts is selected, use Group posts by (All Posts, By Year, By Month, By Category, By Tag, By Author) and Index format (Marked syntax, GitBook syntax, Leanpub syntax, mmd_merge syntax) for the generated indices.
EPUB — Produces valid EPUB 3 books with a built-in nav and manifest, ready for e-readers and ebook apps. EPUB is single-file only. When EPUB is selected, a checkbox Also save Markdown file appears—enable it to write a Markdown copy alongside the EPUB. Use EPUB style to pick a bundled theme: Serif Book, Sans Clean, Goldilocks, Magazine, Ink, Swiss, or Manuscript. Use Preview EPUB Style to see a sample chapter in the app. Use Cover image to choose a custom cover or Reset to Default for an auto-generated cover.
When ready, tap Export Book. You’ll choose a save location (or a folder if “Download images” is on); the app fetches posts, converts HTML to Markdown or EPUB, and writes the file(s).
4. Processing and result
While exporting, BlogBook shows a framed loading animation and progress: “Downloading posts…”, “Converting posts to Markdown…” (or EPUB), and a count (e.g. “42 of 100 posts”). A live stopwatch and estimated remaining time help you gauge how long the export will take. You can cancel at any time; the spinner stops immediately and shows a cancelled state.
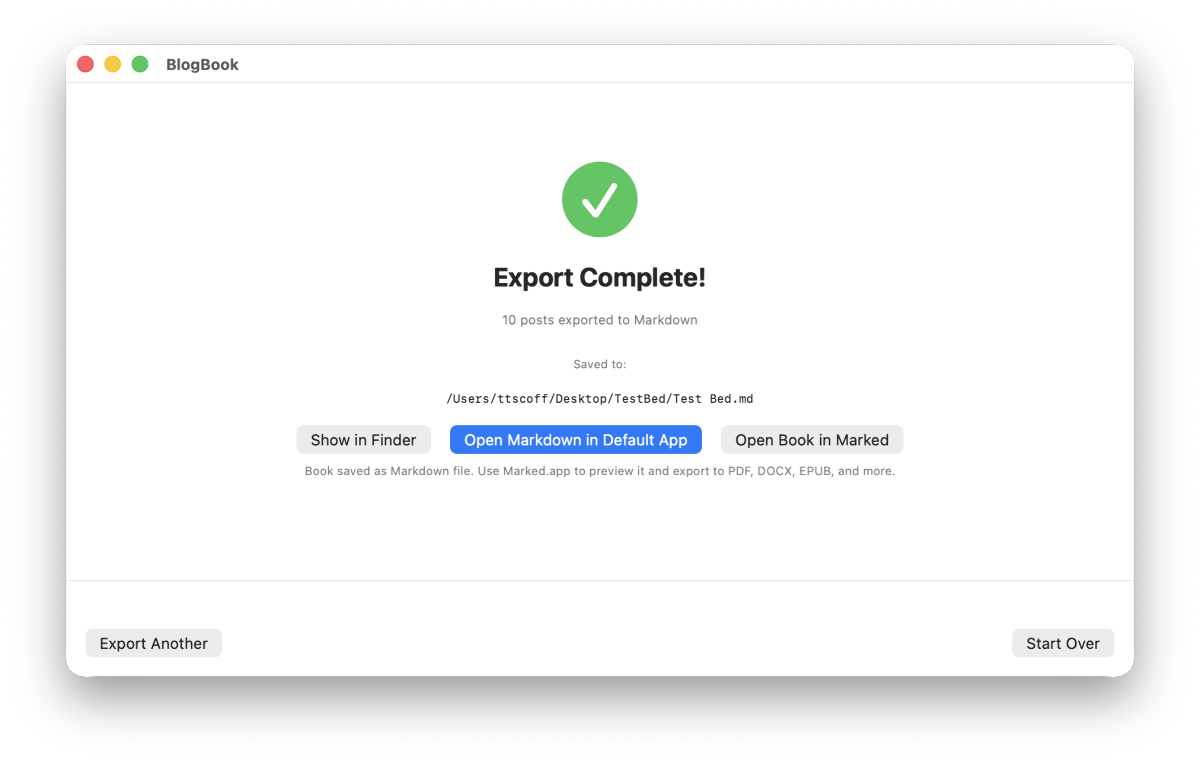
When done, you see Export complete! and the path to the saved file(s).
From there you can:
- Show in Finder — Reveal the file (or folder) in Finder.
- Open Markdown in default app — For Markdown exports, open with your system default for Markdown.
- Open in Marked — If Marked is installed, open the Markdown there to preview and export to PDF, DOCX, EPUB, etc. If Marked isn’t installed, the button becomes Get Marked and opens the Marked website.
- EPUB exports — Open the EPUB in your preferred e-reader or ebook app (e.g. Apple Books).
Use Export another to go back to the filter step (same blog and options) or Start over to return to the credentials screen.
Summary
Flow: Credentials → Filter (categories, authors, tags, date range) → Options (metadata, dates, content, TOC, output format) → Export. The result is Markdown (with optional assets folder) or EPUB, ready for Marked, e-readers, or any compatible tool.
Developed by Brett Terpstra. For support, use the Support page.